3 ways to get the old right-click context menu in Windows 11
With Windows 11, Microsoft added a modern context menu that blends well with the new interface. While it's designed for a quick and clean experience, it lacks some options, and as a result, many of you might prefer the old-fashioned context menu. Well, here are some easy ways to get the old classic right click context menu on your Windows 11 PC.
Get the old classic right-click context menu in Windows 11
The Windows 11 context menu offers basic options to copy, paste, rename, delete, etc. It does away with most of the other options for a clutter-free experience. In fact, even the refresh button has been moved under Show more options.- it was then added with an update.
Although the new context menu looks quite elegant, it is not as user-friendly as the previous one. Fortunately, there are several ways to access the classic Windows 11 context menu. All the methods are detailed below.
1. Via Show more options


The easiest way to access the legacy context menu is to “Show more options”. All you have to do is right click anywhere to open the context menu and press Show more options.
This will open the old context menu with all other options, including third-party app functions. However, this is a two-step process and may be inconvenient for some people. In this case, you can proceed with the other methods below.
2. Using Folder Options in File Explorer
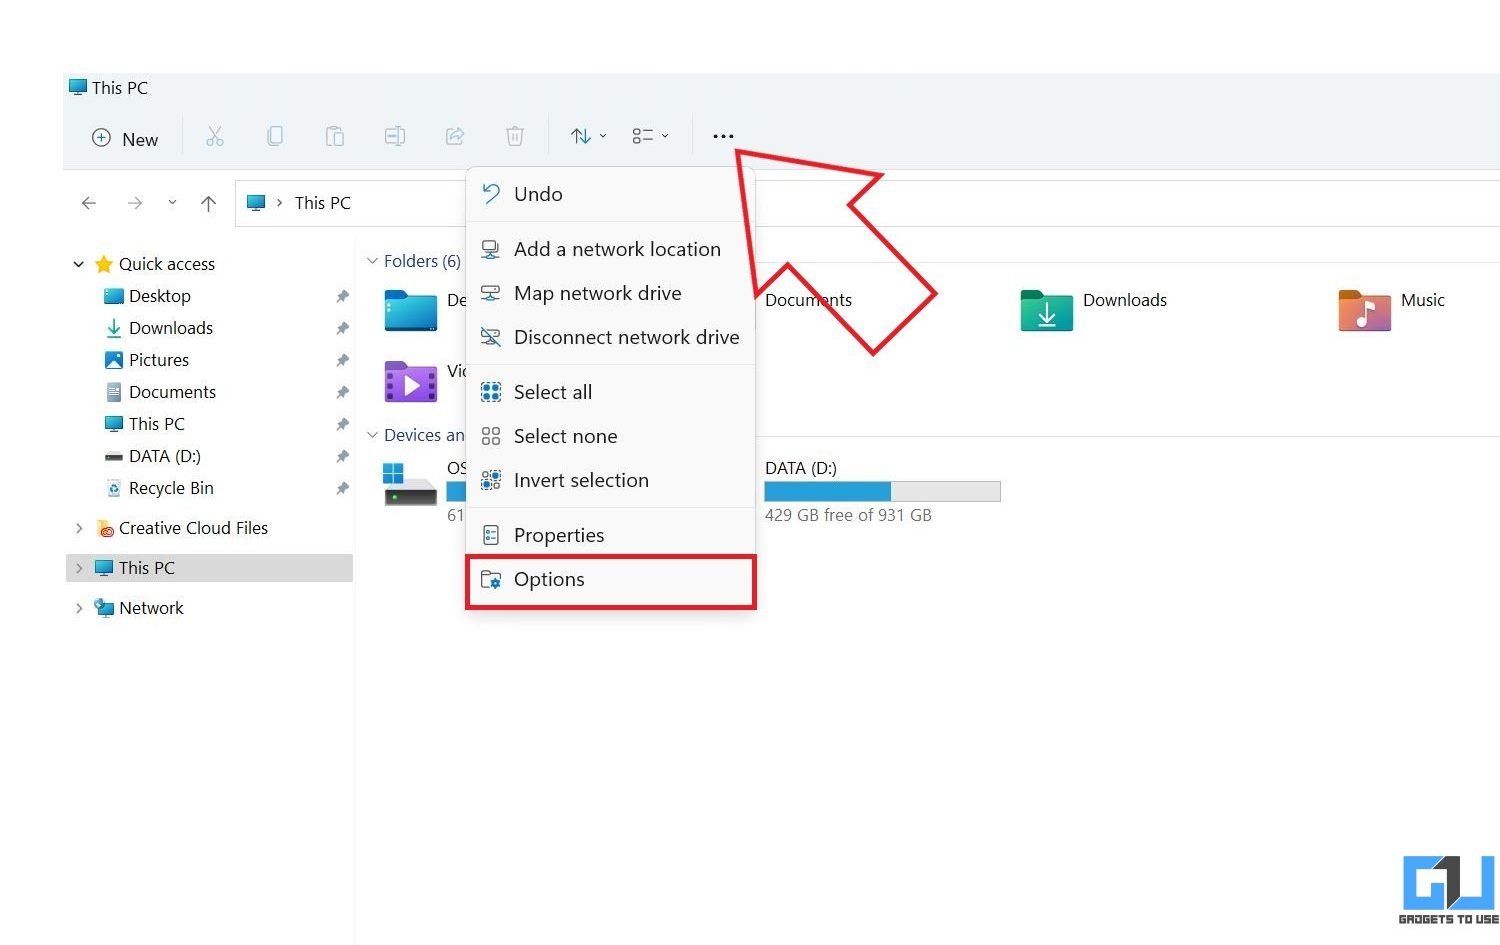
- Open File Explorer. You can do this through the Start menu or by pressing Win + E.
- Here, click on the three-dot menu at the top.
- Select Options from the menu.

- Once the dialog box appears, proceed to View tongue.
- Then scroll down and activate Launch folder windows in a separate process under Advanced settings.

- Click on Apply so what Okay.

File Explorer will close automatically. Open it again and right click anywhere. You will see the old Windows 10 style context menu. However, if that does not work, try restarting your computer.

This method will change the File Explorer menu bar to that of Windows 10. Also, it only works in File Explorer and not on the desktop.
3. Modification of the register
The last method requires you to edit the registry. You can do this in two ways by changing the values manually or through an automatic script.
But before continuing, be sure to backup your registry to return to normal if something goes wrong or affects the normal functioning of your computer.
Manual modification
- press Win + R and enter regedit to open the registry editor. You can also open it from the Start menu.
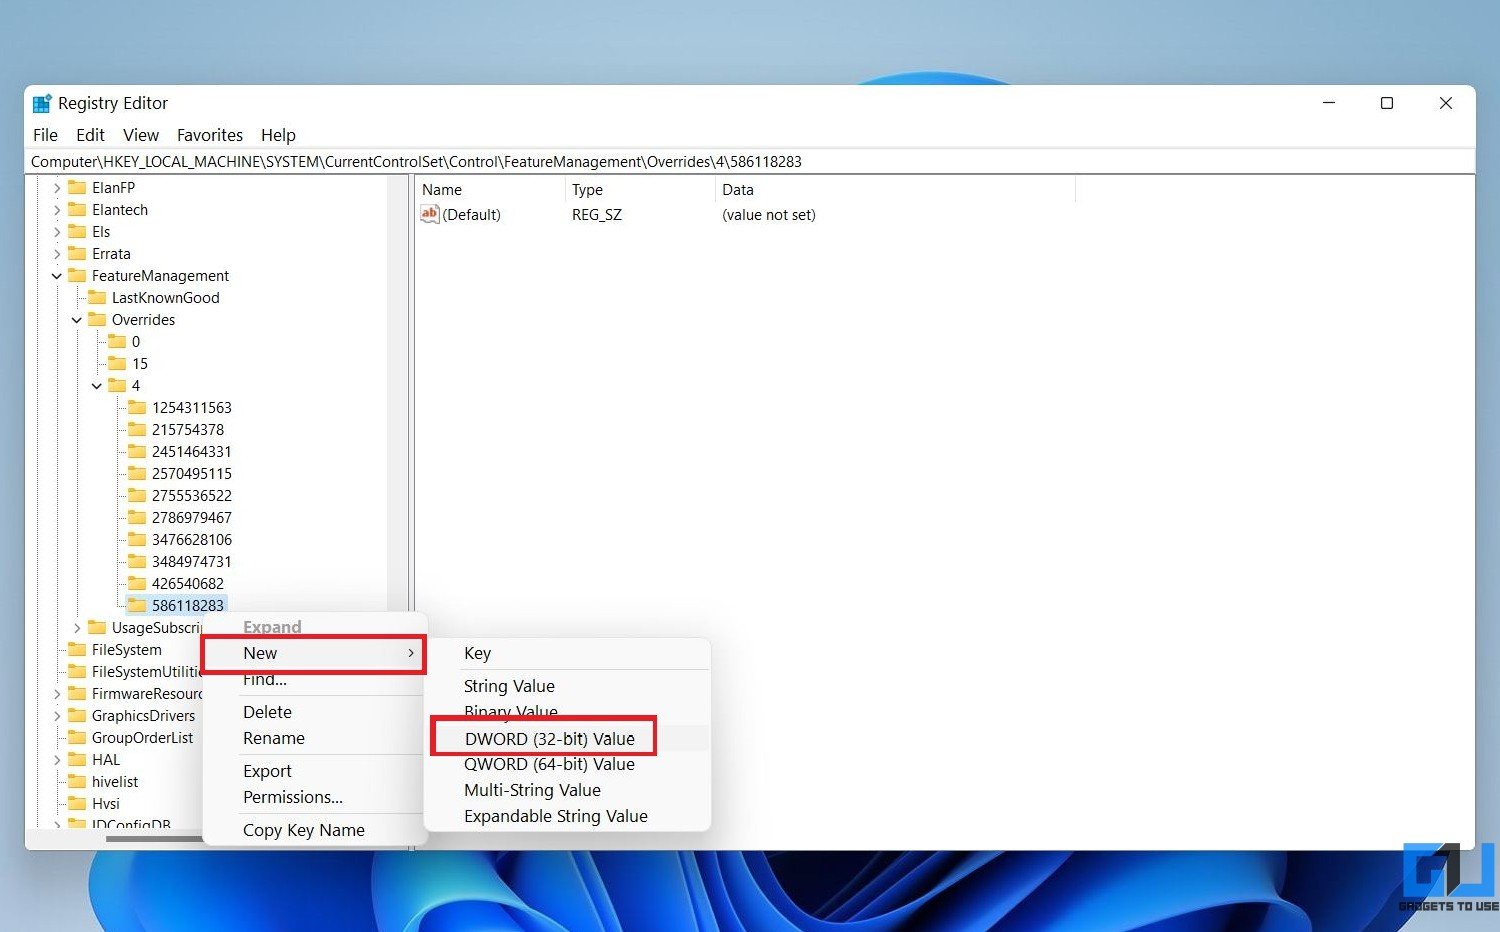
- Once it opens, navigate to HKEY_LOCAL_MACHINESYSTEMCurrentControlSetControlFeatureManagementOverrides4.

- You can either navigate manually by clicking on directories in the sidebar OR copy and paste the path into the registry editor address bar.
- Check if you see a key named "586118283" under 4.

- Otherwise, right click 4, tap New > Key.
- Name the key 586118283 and press Enter.


- Now right click on the 586118283 key you created.
- Tap New > DWORD (32 bits) Enter the value.

- Name it Activated state.

- Likewise, create four more keys with the name EnabledStateOptions, Variant, Variant payload, and VariantPayloadKind.


- Now that you have five entries, you can click on each entry to change its value.
- Click on Activated state et EnabledStateOptions and set it value to 1.

- Then click on Variant, Variant payload, and VariantPayloadKind, put it on value to 0.
- Make sure the values match the following:

- EnabledState-1
- EnabledStateOptions-1
- Variant - 0
- VariantPayload - 0
- VariantPayloadKind-0
 Finally, close the registry editor and restart your computer. Now you will get the old context menu by right clicking.
This method activates the old context menu without changing the menu bar in File Explorer. It works everywhere, including the desktop.
Automatic modification
Don't want to bother modifying the registry? Follow the steps below.

- Download the file here.
- Double-click on the registry file. Faucet Yes when prompted.
- The script will then automatically create the 586118283 key with the required entries.
- You can now restart your computer to recover the old context menu.
OR you can also create the registry file yourself by typing the following into Notepad and saving it with a ".reg" extension:
Windows Registry Editor version 5.00
[HKEY_LOCAL_MACHINESYSTEMCurrentControlSetControlFeatureManagementOverrides4586118283]
"Status activated" = dword: 00000001
"EnabledStateOptions" = dword: 00000001
"Variant" = dword: 00000000
"VariantPayload" = dword: 00000000
"VariantPayloadKind" = dword: 0000000
How to undo the changes?

For the Folder Options method, open File Explorer and press deposit in the upper right corner. Click on Options and once the pop-up opens, deselect "Launch folder windows in separate process" and press Apply so what Okay. Restart your computer.


For those who used the Registry Edit method, open the Registry Editor and repeat the steps to access the key. Right click on the 586118283 key you created. Click on Clear and confirm the prompt.
Conclusion - Classic context menu in Windows 11
These were three quick ways to get the old classic Windows 10 right click context menu on Windows 11. Hope you don't have to complain about the context menu anymore. Anyway, which of the above methods worked best for you? Let me know in the comments. Stay tuned for more articles like this.